waste not, want not chocolate cupcakes

Remember how I said I needed to use up the leftover icing in my last post? Voila! Chocolate cupcakes iced with the leftover Chocolate Buttercream and decorated with leftover Vanilla Buttercream.  The cupcake recipe is from Martha Stewart’s site, though I substituted plain lowfat Greek-style yogurt for the sour cream. The cake was moist and dense and not overly sweet — the perfect foil for the icing. Sooooo good.

many, many mini cupcakes!

I was asked to make mini cupcakes for a celebration at church last weekend. They were expecting about 175 guests, but left the specifics (varieties and number of cupcakes) up to me. After much gnashing of teeth and sketching out possible combinations in my notepad, I decided to make 3 different batters and 3 different icings, resulting in 5 different combos: yellow cupcakes with vanilla buttercream, yellow cupcakes with chocolate buttercream, dark chocolate cupcakes with vanilla buttercream, dark chocolate cupcakes with chocolate buttercream, and carrot cupcakes with cream cheese icing. I thought this would provide the best selection for everyone’s different tastes while not creating an overwhelming amount of work for me.

The whole process went about as smoothly as I could have hoped, thanks to careful planning on my part. I knew I would have a limited amount of time to bake on the day of the gathering, so I made the icings the day before and refrigerated them. Before I used them the next day, I brought them to room temperature, gave each a quick whip in the mixer and I was good to go.  I also “mis-d” my cupcake ingredients the day before, with the plan that I would get up at 5am and have a solid 3 – 4 hours of baking before I had to leave for the morning, then return at lunchtime to ice the cupcakes, and have them delivered to the event by 2:30pm.  Everything really went according to plan aside from my anxious brain waking up at 3am and refusing to settle back down again.  At 4:30am, I called it quits on the night’s sleep and got to work.

All the cupcake batter recipes were from The America’s Test Kitchen Family Baking Book.  Each recipe makes 24 full-sized cupcakes according to the book; when I made them, I portioned them with a #40 (3/4-oz.) scoop which worked out to between 65 – 70 mini cupcakes per batch.

The icings were from a couple of different sources.  The vanilla and chocolate buttercreams were from Brown Eyed Baker (vanilla here, and chocolate here). Both were scrumptious! The cream cheese icing recipe was the original Philadelphia Cream Cheese Frosting recipe from Kraft’s site.  I’ve tried a number of other cream cheese icing recipes and this one remains the most consistent.  I also added a tablespoon of Wilton Meringue Powder to each batch to stabilize the icing, since all were mostly butter (and cream cheese — notoriously hard to work with in warm temps). Note that the carrots on the carrot cupcakes were vanilla buttercream and not cream cheese icing. One more thing: a single batch of each icing was enough to ice all the cupcakes, with icing to spare.

The cupcakes were well-received and I was really pleased with the results.  There were a few minor snafus (AKA learning moments) that I have made note of — mostly having to do with juggling the fiddly little mini cupcake trays in the oven when rotating them and issues with air circulation in the oven, but nothing anyone else would probably notice.  Now on to planning my next batch of cupcakes… need to use up that leftover icing!

mexican chocolate cupcakes with dulce de leche frosting

I decided that this summer I would try my hand at making some less pedestrian cupcakes. For my birthday, I selected these goodies that I pinned a few months back on my “Things to Bake/Make” board on Pinterest. I also attempted (and succeeded) making Dulce de Leche from “scratch” (i.e. from a can of condensed milk) for the first time. When I originally selected the recipe, I thought I was going to be able to find already-prepared (canned) Dulce de Leche quite readily at my local supermarket, but no such luck. In spite of the extra step, they were undoubtedly the better for my having made my own Dulce de Leche.

I did a fair amount of research before making my own Dulce de Leche. The standard way is to make it by submerging a sealed can of sweetened condensed milk in a simmering pot of water for a couple hours or so, but apparently that technique comes with a fair amount of risk, of the can exploding.  That really didn’t sound appealing to me.  There are other techniques as well, including baking the contents of the can over a water bath (as David Leibovitz describes here) for an hour, or the method I employed: slowly microwaving the sweetened condensed milk at 30% – 50% power and whisking at regular intervals.  I felt the most comfortable with this technique because (a) it seemed to be the least time consuming, (b) it was a warm day and would heat up my kitchen the least, and (c) I felt I had the most control over the process this way.  I didn’t want to burn it or heat it to the point of turning the milk into rock hard candy. Since I would be taking the Dulce de Leche out of the microwave every couple minutes and whisking it, I would have a better handle at its state at any given point. I was really happy with this method and definitely would make it this way again. One tip — place the milk in the biggest bowl that will fit in your microwave. 14 ounces of sweetened condensed milk doesn’t look like that much, but when it starts to boil in the microwave, it really bubbles up. There were times when I was intoning “stop, stop, stop” as the milk rose to the top of the bowl. Fortunately, the microwave power always seemed to cycle off before it could boil over.

Here are directions I used, from Carnation’s site.  They seemed to use the most conservative time and power settings of the different microwaving instructions I’ve read. I cooked mine an additional 2 minutes at 30% power, for a total of 14 minutes at 30%. Note also that after the Dulce de Leche has cooled, you may have to warm it slightly over a warm water bath to make it pliable enough to beat with the cream cheese for the icing.

Pour 1 14-oz. can sweetened condensed milk into a large microwave-safe bowl. Cook on medium (50%) power for 4 minutes, stirring halfway through heating time. Reduce power to medium-low (30%) power; cook for 8 to 12 minutes, stirring with wire whisk every few minutes, until thick and light caramel-colored. 


Note: Microwave ovens may vary; adjust timing accordingly. 

The cupcake and icing recipe is from Jennifer’s Bake or Break blog. The addition of cinnamon to the chocolate batter is what gives them a Mexican chocolate flavor. I used Hershey’s Special Dark cocoa powder (a mixture of Dutch-processed and unsweetened cocoa powders) for a darker, richer and mellower chocolate flavor, rather than using the straight unsweetened cocoa powder called for.

I also converted the volume measurements in the cupcake recipe into weights, as I am a compulsive scaler.  Here are my conversions:

  • 8.5 oz. all-purpose flour
  • 2 tsp. baking powder
  • 1/2 tsp. salt (I used a slightly heaping 1/2 tsp. of coarse sea salt)
  • 2 tsp. cinnamon
  • 1.5 oz. mixture of Dutch-processed and unsweetened cocoa powder (such as Hershey’s Special Dark cocoa powder)
  • 8 oz. unsalted butter, softened
  • 10.5 oz. granulated sugar
  • 4 oz. light brown sugar
  • 3 large eggs
  • 1 tbs. vanilla extract
  • 8 oz. milk
You can read the rest of the cupcake recipe and the frosting recipe on the Bake or Break site.
To ice the cupcakes, I piped the icing on in a swirl (I don’t really like how it looks when I spread it on with a spatula), using a Wilton #12 round tip.  I had just enough to ice all 24 cupcakes with no icing left over, so ration carefully (and sample sparingly!). To finish, I garnished each cupcake with a piece of chewy caramel candy, cut into quarters. 
The cupcakes were phenomenal.  The cake itself was moist and rich and the icing’s cream cheese-Dulce de Leche combo was a great compliment to the cake — not too sweet and just a hint of caramel-y goodness. My husband took a few into work and they were very well-received. Thanks to Jennifer for a fabulous pair of recipes!

it’s apple season!

I made these cute cupcakes a few weeks ago, in celebration of the boys’ return to school. The cake itself was from a mix (Wilton-approved Duncan Hines Dark Chocolate Fudge) that I happened to have on hand. The icing was the Chocolate Frosting recipe from The America’s Test Kitchen Family Baking Book. I don’t know what the problem was with my icing recipes this summer — maybe it was just the increased warmth — but they typically did not turn out well at all. I remember it being a fairly cool day, inside and out, and still the icing turned out soupy, about the consistency of warm pudding, even after refrigerating the icing for several hours before piping. It was such a disappointment. You can see that the icing in the photo doesn’t look very sharp; I took this picture after chilling the iced cupcakes overnight. After about 15 minutes out of the fridge, the piped icing lost much of its definition.

For the toppers, I tinted some fondant with Americolor soft gel pastes — Super Red for the apples, and Leaf Green for the leaves. I really love this product — the colors turn out bright without using a ton of gel paste; I much prefer them to Wilton icing gel colors. I also painted on a little straight gel paste for some highlighting on the apples so they wouldn’t look quite so flat. I love how they turned out!

birthday chocolate cupcakes for ann

Sometimes all you need is a wee taste of chocolate. Suzanne Lenzer wrote a great post for Mark Bittman’s blog back in June in which she featured the legendary Maida Heatter‘s recipe for chocolate cupcakes with chocolate ganache frosting (adapted from Maida Heatter’s Book of Great Desserts). I was so charmed by the accompanying photo that I filed the recipe away for later use.

Yesterday we belatedly celebrated my dear mother-in-law’s birthday and I wanted to bake something chocolate for the occasion. Cupcakes were perfect because they are portion-sized, sophisticated-looking and easy to share (and transport). While the recipe was simple to make, I found the cake itself to be a little dry and not quite as rich as I had hoped — thankfully the ganache picked up some of the slack. I decorated the cupcakes with more flowers (daisies, purple pansies and yellow rosebuds) from my stash.

Happy Birthday, Ann!

birthday pupcakes

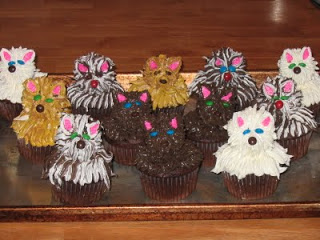
For as long as we can remember, our son C. has been crazy about dogs. At first we attributed it to a longing for a pet we couldn’t have, as L. is allergic to dogs and cats. But two years ago, we found a breed that didn’t trigger L.’s sneezes and headaches – miniature schnauzers – and we got one of our own. I thought that perhaps C.’s enthusiasm might lessen just a tad, but no – if anything, having Daisy in our lives has only intensified his zeal. For his birthday this year, two of C. and my common interests came together – we made dog cupcakes.

We consulted Karen Tack and Alan Richardson’s wonderful Hello, Cupcake! Irresistibly Playful Creations Anyone Can Make for instructions. Initially we planned to make cupcakes representing each of the breeds featured in the book – dalmatian, collie, beagle, bulldog and (of course) the schnauzer among them – but forces conspired against us and in the end, we decided just to make the West Highland terriers that are shown on the book’s cover.

The Westies are made using a standard-size cupcake for the body/base and a mini cupcake (on its side) for the head. With the addition of some cleverly cut mini marshmallows and artfully applied frosting – voilà! You have yourself a cute little pupcake.

Tack and Richardson make it easy for the newbie decorator to master. They encourage the use of cake mixes and canned frosting, and give instructions on how to use ziplock bags instead of pastry bags to apply the frosting. C. found a recipe in the book that explained how to enhance the boxed cake mix by substituting buttermilk for water and adding an additional egg. He was eager to try it, so try it we did. Although the authors suggest using canned frosting in the book, I read on their website that recently there have been reader complaints about changes in the consistency of the store-bought frosting. Tack and Richardson now recommend that readers use the Almost Homemade Buttercream Frosting recipe in the book instead of the canned stuff. It’s made with Marshmallow Fluff, butter (a lot of it!), vanilla and confectioners’ sugar, and seemed simple to make so we tried that as well.
Although we made the cake using the modifications suggested by the authors, I really didn’t feel like it tasted much different than if we had simply followed the directions on the box. Admittedly, it’s been a very long time since I’ve eaten a boxed mix cake so I could be wrong. The Almost Homemade Buttercream Frosting tasted to me like sweetened whipped cream – buttery, but not excessively sweet. It held up OK, but (predictably) became runnier as it warmed from the heat of our hands. Next time, I will try adding a little meringue powder to stabilize it.

C. was a natural at decorating the cupcakes using the ziplock baggies, but I just couldn’t get the hang of it. I ended up using a parchment bag and a small star tip for my frosting, which C. proclaimed was “cheating.” However, by the end I think he had to concede that the baggie method had its share of problems – the baggies would stretch or split from the pressure and it was often difficult and frustrating trying to gently squeeze frosting through the small cuts in the baggie (the cuts were to mimic the use of a tip). I really love the designs in Hello, Cupcake! but I think I would prefer to execute them using conventional decorating equipment.

The finished pupcakes were very cute – almost too cute to eat. C. ate the body of one last night but still hasn’t brought himself to eat the head. I really hope that I don’t end up with a container full of little Westie heads in my kitchen by week’s end!

(Happy 12th Birthday, C.!)

cupcake decorating

These are from last night’s cake decorating class. They’re somewhat sad-looking; I was a little late to class and never quite recovered from feeling harried. The flowers, fruit, heart and bears are straight from the book, but the lavender-yellow creation is all my very own. I did that one at home this afternoon. It’s not attractive, but it does use one of the techniques we learned last night. C. was chomping at the bit to devour the whole batch, but I told him he couldn’t finish them off until I had finished decorating and photographing them all. He proclaimed the devil’s food cupcakes delicious (it’s been one of the few things he’s managed to eat since he got his palate expander earlier this week) but I can’t take any credit; the cake is from a box and the frosting is the usual Crisco-laden Wilton class buttercream icing. Actually, even C.’s not a fan of this icing, but he said it doesn’t taste as bad with the boxed cake mix. I figure that’s because he’s accustomed to that particular synthetic taste combination, having eaten plenty of boxed cake mixes with ready-made (and shortening-heavy) canned frosting. We’ve come a long way, as he now largely prefers homemade baked goods (except for homemade brownies — we’re still working on that!).